In the world of fashion photography, the invisible mannequin technique has become a game-changer. This innovative method allows clothing to be showcased in a way that highlights the garment itself without any distractions.
In this blog, we’ll delve into what the invisible mannequin technique is, why it’s important, and how you can achieve this effect step-by-step. Whether you’re a fashion photographer, an online retailer, or simply a fashion enthusiast, this guide will help you understand and implement this trendy technique.
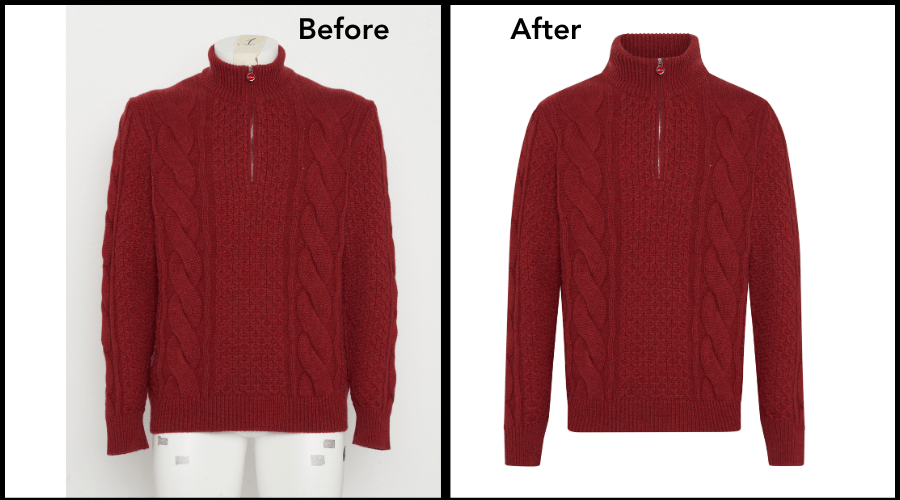
What is the Invisible Mannequin Technique?
The invisible mannequin, also known as the ghost mannequin effect, is a photography technique used to create the illusion that clothes are floating in mid-air, perfectly shaped as if worn by an invisible person. This is achieved by photographing a mannequin wearing the clothes and then digitally removing the mannequin in post-production.
Why Use the Invisible Mannequin Technique?
- Highlight the Garment: By removing the mannequin, the focus is solely on the clothing, allowing potential buyers to see the shape, fit, and design details clearly.
- Consistency: It provides a uniform look for all products, making an online store or catalog look professional and organized.
- Versatility: This technique can be used for a variety of clothing items, from shirts and jackets to dresses and pants.
- Engagement: High-quality, visually appealing photos can increase engagement and sales.
Step-by-Step Guide to Achieving the Invisible Mannequin Effect
Preparing the Garment
Before you even start photographing, ensure that the garment is prepared:
Iron the Clothes: Make sure the clothes are wrinkle-free for a clean look.
Styling: Use clips, pins, or double-sided tape to ensure the garment fits perfectly on the mannequin.
Choosing the Right Mannequin
Select a mannequin that fits the clothing well. It should be of the right size and shape to ensure the garment is displayed correctly.
Detachable Parts: Mannequins with detachable parts, especially at the neck, arms, and torso, make it easier to achieve the invisible effect.
Neutral Color: A neutral-colored mannequin, preferably white or gray, is ideal to minimize color reflections on the clothing.
Setting Up Your Studio
A well-prepared studio setup is crucial:
Background: Use a plain, white background for clean and consistent photos.
Lighting: Ensure even lighting with minimal shadows. Softbox lights on either side of the garment work well.
Camera Settings: Use a high-resolution camera with the right settings. An aperture of f/8 to f/11 provides a good depth of field.
Photographing the Garment
Take multiple shots to capture all necessary angles and details.
Front and Back: Capture the garment from both the front and back.
Details: Take close-up shots of important details like buttons, zippers, or embroidery.
Inside Out: For items like jackets, photograph the inside lining. This image will be used to create the illusion of depth in post-production.
Post-Production Editing
This is where the magic happens. You’ll need photo editing software like Adobe Photoshop to remove the mannequin and combine images.
Import Images: Open your images in Photoshop.
Select the Mannequin: Use the Pen Tool or Quick Selection Tool to outline the mannequin.
Remove the Mannequin: Once selected, delete the mannequin part to reveal the background.
Combine Layers: For items like jackets or shirts, combine the inside-out shots with the main image to create depth. Place the inside shot behind the main shot and adjust as necessary.
Refine Edges: Use the Eraser Tool or Masking to refine edges and ensure a seamless look.
Color Correction: Adjust brightness, contrast, and colors to ensure the garment looks its best.
Final Touches
Make sure every detail is perfect before finalizing the image.
Check for Flaws: Zoom in and check for any imperfections or remnants of the mannequin.
Consistency: Ensure all images have a consistent look in terms of lighting and background.
Save Files: Save your images in high resolution for best quality, and also in web-optimized formats for online use.
Tips for Perfecting the Invisible Mannequin Technique
Practice: Like any skill, practice makes perfect. Experiment with different garments and lighting setups to find what works best.
Quality Equipment: Invest in good quality mannequins, lighting, and camera equipment. It will make a significant difference in the final result.
Attention to Detail: Pay attention to the small details. They can make or break the overall look.
Software Skills: Improve your photo editing skills. There are many tutorials available online to help you master Photoshop or similar software.
Conclusion
The invisible mannequin technique is a powerful tool in fashion photography that can elevate the presentation of clothing, making it more appealing to potential buyers. By focusing on the garment and removing distractions, you can create stunning, professional images that showcase the best features of each piece. With the step-by-step guide provided, you’re now equipped to start experimenting with this trendy technique. Happy photographing!
